 Español
  English (UK)
During this summer vacation, I dedicated my time to upgrading my home automation server running Home Assistant. I swapped out my trusty SolidRun Cubox-i for a new Beelink mini PC. As I got more involved, I found myself diving back into the development of MeteoHome, making changes, and brewing up new ideas to enhance it.
But, what is MeteoHome, you might ask? Well, it’s a DIY programming project I started way back in 2016. It’s essentially a weather station that uses an ESP8266 devboard and DHT22 and BMP180 sensors. What sets it apart from similar projects is its straightforward configuration through a captive web portal. It also uses MQTT to send data to a server and is designed to have all this data collected by Home Assistant. This means you can easily check the current sensor status and historical graphs.
Unifying MeteoHome and CO2 Detector
Apart from this, during the peak of the COVID pandemic, I embarked on a parallel project, largely reusing MeteoHome’s code but with a focus on CO2 level detection. This led to the birth of CO2 Detector, inspired by an interesting article. After researching which sensor to use, I opted for the SGP30, which seemed like an excellent choice. Following some experiments, I modified the code from the other project and built two prototypes that I used in my home during those challenging times. Like the other project, this device uses an MQTT queue to send data to an IoT gateway (in my case, Home Assistant once again). It also features three LEDs to indicate the current air status based on CO2 PPM levels, as follows:
- The green light comes on when there are less than 600 PPM of CO2.
- The yellow light indicates a CO2 concentration between 600 and 800 PPM.
- The red light warns when CO2 concentration exceeds 800 PPM.
Having free time during these vacations made me realize that these projects weren’t so different after all and could be unified both in terms of hardware and software. The process has just begun, and the combination of MeteoHome and CO2 Detector already offers many possibilities both inside and outside our homes. At present, I have some devices combining a DHT22 with a BMP180 to measure temperature and humidity, others with a DHT22 and an SGP30 to monitor temperature and air quality, and finally, I’m trying to revive the outdoor prototype, which is similar to the first one but runs on a battery and a solar panel.
To sum it up, the main features of the new unified project would be:
- Depending on the sensors installed on the board, it measures temperature, humidity, atmospheric pressure, and air quality.
- Configuration of WiFi network and MQTT through a web portal.
- Optionally includes deep sleep mode to operate on batteries.
- Fully compatible with Home Assistant.
- Published as Open Source Hardware.
In addition to this, I’ve also made some technical changes that I believe are worth mentioning:
-
Code adapted for development in PlatformIO. This IDE, in my opinion, surpasses the one provided by Arduino, and thanks to its tools (specifically the pio program for the shell), it simplifies compilation tasks that can be automated.
-
Based on what I just mentioned, I am now using Github Actions to perform very basic CI/CD, for now checking that the code builds correctly when it reaches the repository.
-
Code refactoring. If you’re a programmer, you’ll know that you don’t like any code you wrote more than three months ago. This was one of the reasons to start changing the code, along with the switch to PlatformIO and the idea of modularizing the use of sensors a bit.
-
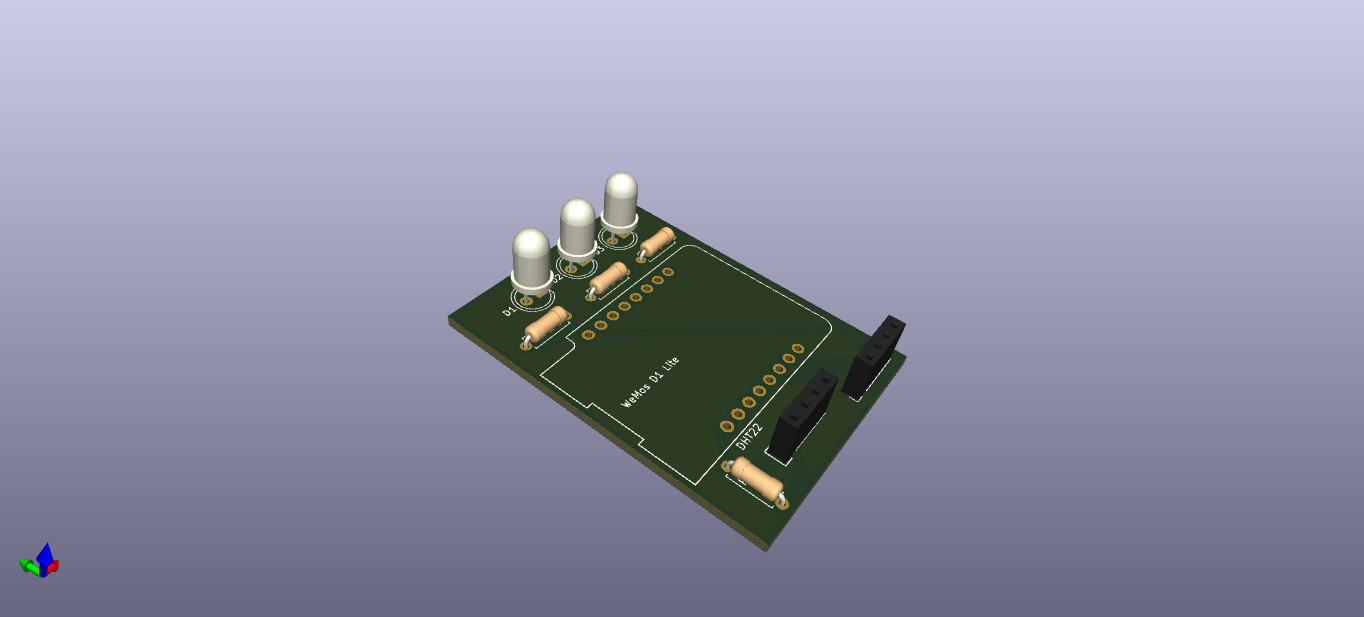
As for the hardware, the boards I created for CO2 Detector are a good starting point. In fact, it is already certified as open source hardware and is what I am using along with the new version of the source code. The only change I’ve made so far is to add some labels to better identify the connections on the PCB.
If you liked what I’ve shared, now it’s your turn
This new journey has just begun. If you want to join the fun, I invite you to visit the GitHub repository. What do you need to get involved? Here’s a list of requirements and necessary elements:
Requirements:
Hardware:
- A NodeMCU ESP8266 devboard.
- At least one DHT22, BMP180, or SGP30 sensor.
- LEDs to display air quality status.
- A breadboard with cables or send the hardware part of the project to be manufactured by PCBWay or a similar service.
- Other components like resistors, etc., which you can check in the BOM list.
Software:
- PlatformIO for development and programming with the Arduino framework.
- Additional libraries needed: WiFiManager, Arduino Json, PubSubClient, DHT, and Adafruit BMP85 (check the platformio.ini file in the repository).
- MQTT server.
- Home Assistant for data visualization.
The future of MeteoHome is full of exciting possibilities, and I have many ideas in my head that I will be sharing little by little.